

You lay down after a day of work, ready to snuggle up in your covers and get some much-deserved rest, but as you try to drift off to sleep, you are continuously annoyed by the sound of running water. It’s the toilet again; like a kid at bedtime, it just can’t get enough water. A continuously running toilet is enough to drive anyone crazy, but with our easy-to-follow tips, you can fix your toilet with inexpensive parts that you can find at your local hardware store.
The picture below should help you identify the parts we talk about later if you’re unfamiliar with the parts inside your toilet tank.
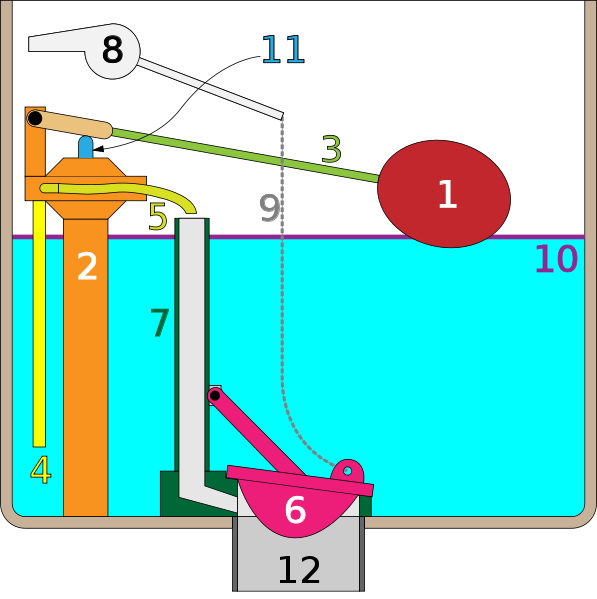
The parts listed in the image are as follows:
- Float
- Flush valve
- Float arm
- Supply tube
- Fill tube
- Flapper
- Bowl refill tube
- Flush handle
- Flapper chain
- Water fill line
- Float adjustment screw
- Flush valve
Make Sure the Fill Tube is Properly Connected
The fill tube (number 5 on the image) sprays water down the overflow tube to refill the bowl for the next time you flush the toilet. If the tube falls off, it’s unlikely that it will cause your toilet to run, but it will cause your toilet flushes to be much weaker, so it’s a good one to check on since you’re already in there.
Adjust the Float Height
The float in the image above (number 1) is a ball-type float. If your toilet has one, ou can set the water height by bending the rod up or down until it shuts off the fill valve at the correct water level.
If your toilet has a circular, black, plastic part connected to the stem of the fill valve, then there will be a clip and rod on the side that you use to adjust the water level. It’s crucial to ensure the float is set at the right height because if it is too high, it will continuously fill the tank with water and spill over the overflow tube into the bowl, causing that dreaded running sound. To fix this, one look at the back wall of the tank on the inside. There should be a line for how high the water in the tank should be. Transfer this mark to the overflow tub so it’s easier to see and judge the level. Now, adjust your float up or down until the water fills the line you made after each flush.
Adjust the Flapper Chain
If your flapper chain (number 9 on the image) is too short or tangled, it will hold the flapper (number 6) open, continually draining water out of the tank and into the bowl. Adjust the flapper chain so that there is a little slack when the handle is up. Make sure not to make the chain too long, either g or r, as that won’t allow enough water to be added to the bowl for each flush and will cause weak flushes.
Replace the Flapper
If you tried all these and your toilet is still running, then the flapper (number 6 on the image) is probably the problem. Flappers can wear out as they age and no longer create a perfect seal, allowing water to trickle into the bowl. Luckily, this one is also an easy fix.
Turn the water supply to your toilet off and disconnect the flapper. Before you head to the hardware store, write down your toilet’s brand and model. Many flappers will have the toilets they are compatible with listed on the package, so having this information is helpful. If you can’t find a flapper compatible with yours, look for a universal one and compare it with the flapper on your toilet to see which is closest. Ensure the new flapper attaches to the bathroom like your old one did. Some clip onto the base of the overflow tube, and others have a ring attached that slips over the top of the tube.
Tired of Chasing that Running Toilet? We Can Help
If you’re tired of tinkering with that running toilet, don’t despair. Our Albuquerque Plumbing Heating & Cooling plumbers can take care of it for you. WheYou can call on us whenur toilet won’t stop running, o for any other plumbing repair, yf you’re looking for fast and reliable drain cleaning, then check out our services in the following locations: